Balloon up using chemical reactions

What you'll need:
    Image result for balloon
  1. Balloon
  2. About 40 ml of water (a cup is about 250 ml so you don't need much)
  3. Soft drink bottle
  4. Drinking straw
  5. Juice from a lemon
  6. 1 teaspoon of baking soda
How to do it:
  1. Before you begin, make sure that you stretch out the balloon to make it as easy as possible to inflate.
  2. Pour the 40 ml of water into the soft drink bottle.
  3. Add the teaspoon of baking soda and stir it around with the straw until it has dissolved.
  4. Pour the lemon juice in and quickly put the stretched balloon over the mouth of the bottle.
What's going on:

If all goes well then your balloon should inflate! Adding the lemon juice to the baking soda creates a chemical reaction. The baking soda is a base(Sodium Bicarbonate), while the lemon juice is an acid (citric acid), when the two combine they create carbon dioxide (CO2). The gas rises up and escapes through the soft drink bottle, it doesn't however escape the balloon, pushing it outwards and blowing it up. If you don't have any lemons then you can substitute the lemon juice for vinegar.

NaHCO3 + C6H8O7 ---->  3 CO2 + 3 H2O + Na3C6H5O

Floating Ball

Image result for floating ball in airWhat you need:
1. A small light ball (like a ping pong ball) covered with foil
2. A circular piece of paper
3. A straw
4. Some tape

How to do:
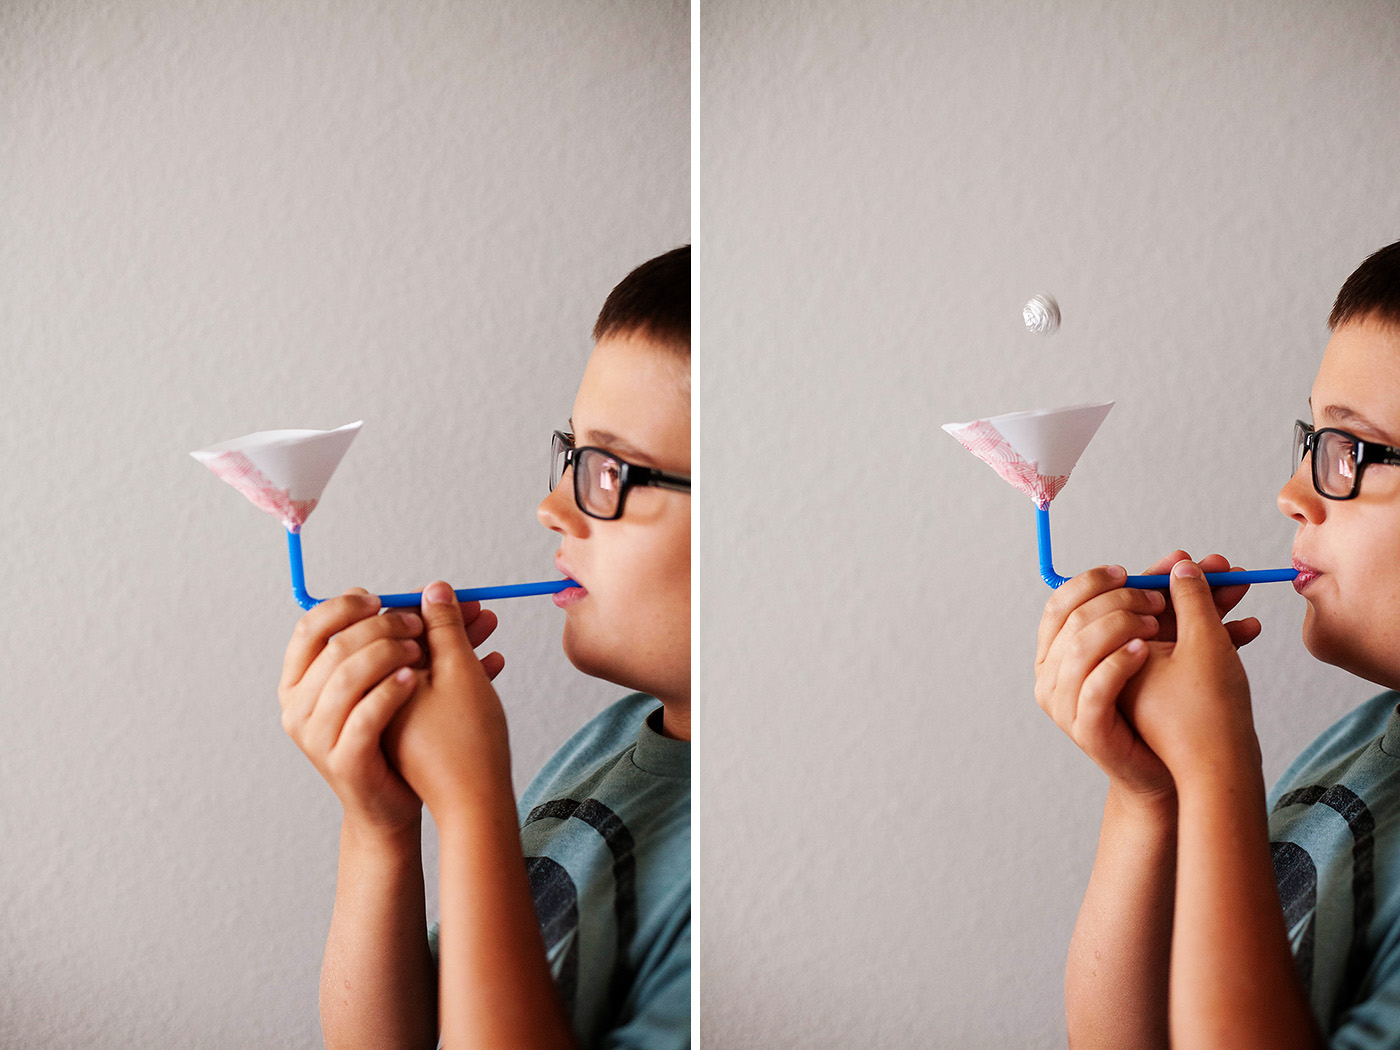
1. Cut a slit on the circular piece of paper to the center.
2. Roll it into a funnel shape and tape it inside and outside.
3. Cut a small slit just enough to let the short end of the straw to pass through.
4. Insert the short end of the straw through the hole (not completely but just enough to stick it to the funnel) and tape it to the funnel.
5. Place the ball inside the funnel and blow through the other end of the straw. You would see the ball floating.

Why it happens:
When you blow air through the straw into the funnel, it gives the required force to counter the effect of gravity on the ball. This makes the ball appear to float.

Popsicle Stick Catapult

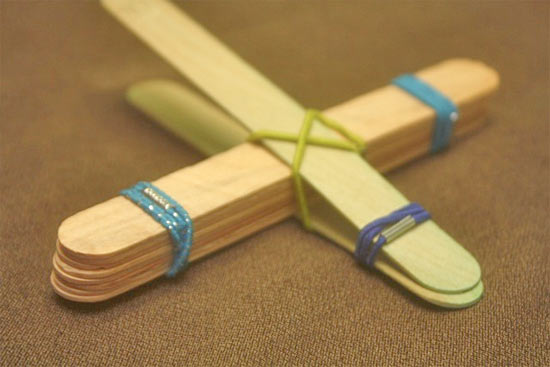
Related imageWhat you need:
1. 9 Popsicle sticks
2. 5 rubber bands
3. A projectile of your choice

How to make it:
1. Stack four Popsicle sticks. Using a rubber band at each end, squeeze the bundle tightly together. 
2. Place the remaining two Popsicle sticks together. Bundle only one end together using an additional rubber band. 
3. Pry the un-bundled end open enough to be able to slide the set of four sticks in between perpendicularly to form a cross. Slide the bundle of four sticks down as closely as you can get it to the rubber band that’s holding the two sticks together. 
4. Finish your catapult by securing the body to the wings (diagonally at the point where the Popsicle sticks intersect) by crisscrossing a rubber band from the back of the right wing to the front of the left several times. Repeat with the final rubber band. 
5. Place your projectile at the end of the Popsicle stick that is highest in the air. Hold the set of four sticks with one hand, and push down on the angled stick just behind the projectile. 
6. Release your projectile!

Whats going on:
A lever is a simple machine that uses a beam attached to a pivoting hinge, or fulcrum, to amplify the amount of force applied to one end. The lever provides mechanical advantage, or leverage, to make it easier to perform work on the other end.
Catapults were used in warfare for centuries, and are a great example of the power of a lever in action. By affixing a popsicle stick at a right angle (T-shape) to another, you are effectively using the bottom one as the fulcrum for the top. By adding force to change the shape of the bow or popsicle stick from its original resting position, you add stored (potential) energy to the wood. By stacking the
popsicle sticks to increase the height of the fulcrum, then moving the end of the lever higher in the air (longer lever), you allow for more distance for the lever to build more potential energy as you pull it down. When you release your catapult, you’re quickly transferring that stored potential energy into kinetic energy that sends your projectile flying.

Soap water and pepper expiriment

Materials

  1. Soap
  2. Bowl of water
  3. Pepper (powder)
  4. Some fingers
How to do it
  1. Take a bowl of water and put some powdered pepper over it.
  2. Dip your finger into it 
  3. Note down the observation 
  4. Now dip your finger in soap water and repeat the same experiment
  5. Note down the observation
What happens
  1. When you dip your finger no change is noted
  2. When you dip your finger in soap and repeat the same, the pepper moves away and their arrangement is broken
Why it happens
Soap breaks the surface tension of water. This causes the pepper to move away along with the water. That is why kit looks as if the soap repeals pepper.

Colour changing liquid

IMPORTANT SAFETY INFORMATION: 
  1. This experiment should only be done with the help of an adult. 
  2. Iodine will stain just about anything it touches and it can be hazardous. 
  3. Hydrogen peroxide can cause eye and skin irritation - safety goggles are needed throughout the experiment. 
  4. Be sure your helpful adult reads the caution labels on each container.


Materials Required
  1. 3 clear plastic cups 4 ounces or larger
  2. A 1000 mg Vitamin C tablet from the pharmacy (you can also use two 500mg)
  3. Tincture of iodine (2%) also from the pharmacy
  4. Hydrogen peroxide (3%) yep, also from the pharmacy
  5. Liquid laundry starch (see below for alternatives)
  6. Safety goggles
  7. Measuring spoons
  8. Measuring cup
  9. An adult helper

Procedure
  1. Put on those safety goggles and mash the 1000 mg Vitamin C tablet by placing it into a plastic bag and crushing it with a rolling pin or the back of a large spoon. Get it into as much of a fine powder as possible. Then put all the powder in the first cup and add 2 ounces (60 ml) of warm water. Stir for at least 30 seconds. (The water may be a little cloudy) Let’s call this “LIQUID A”
  2. Now put 1 teaspoon (5 ml) of your LIQUID A into a new cup and add to it: 2 oz (60 ml) of warm water and 1 teaspoon (5 ml) of the iodine. Notice the brown iodine turned clear! Let’s call this “LIQUID B.” By the way, you’re done with LIQUID A - you can put it aside.
  3. In the last cup, mix 2 oz of warm water, 1 Tablespoon (15 ml) of the hydrogen peroxide and 1/2 teaspoon (2.5 ml) of the liquid starch. This is, you guessed it, “LIQUID C”
  4. Okay, that was a lot of preparation, on to the fun part. Gather the friends and family and pour all of LIQUID B into LIQUID C. Then pour them back and forth between the 2 cups a few times. Place the cup down and observe….be patient....somewhere between a few seconds and a few minutes, the liquid will suddenly turn dark blue!
How does it work
  1. This is an example of the chemical reaction known as the IODINE CLOCK REACTION. 
  2. It is called a clock reaction because you can change the amount of time it takes for the liquids to turn blue.
  3.  The chemistry of the demonstration gets a bit complicated, but basically it is a battle of chemistry between the starch which is trying to turn the iodine blue, and the Vitamin C which is keeping it from turning blue. 
  4. Eventually the Vitamin C loses and, bam! - you get instant blueness. 


Cautions
Note: If you do not have liquid starch, you can also use 1/2 teaspoon of corn starch or potato starch. The liquids will be more cloudy and the reaction will happen a bit more slowly, but it’s still impressive.
Clean up: Carefully pour all liquids down the drain with plenty of water and wash your hands. Recycle the cups or dispose of them in the trash. 

Balloon Rocket

Materials Required

  1. Balloon
  2. Straw
  3. String
  4. Two chairs
Procedure
  1. Take the straw and stick it to the balloon and push the string through the straw.
  2. Tie two ends of the string to the two chairs.
  3. Inflate the balloon and let it go 
Observation and reason
  1. The balloon goes woosssshhhhhh.
  2. It is because of the imbalance between the two ends of the balloon.

Parachute

What you'll need:
1.      A plastic bag or light material
2.      Scissors
3.      String
4.      A small object to act as the weight, a little action figure would be perfect.
Instructions:
1.      Cut out a large square from your plastic bag or material.
2.      Trim the edges so it looks like an octagon (an eight sided shape).
3.      Cut a small whole near the edge of each side.
4.      Attach 8 pieces of string of the same length to each of the holes.
5.      Tie the pieces of string to the object you are using as a weight.
6.      Use a chair or find a high spot to drop your parachute and test how well it worked, remember that you want it to drop as slow as possible.
What's happening?

Hopefully your parachute will descend slowly to the ground, giving your weight a comfortable landing. When you release the parachute the weight pulls down on the strings and opens up a large surface area of material that uses air resistance to slow it down. The larger the surface area the more air resistance and the slower the parachute will drop. Cutting a small hole in the middle of the parachute will allow air to slowly pass through it rather than spilling out over one side, this should help the parachute fall straighter.

A can rolls on its own

Materials Required
1. Empty soda cans.
2. blown-up balloon
3. A head of hair

How do I Io It
1. Place the can on its side on a flat smooth surface like a table or a smooth floor.
2. Rub the blown up balloon back and forth through your hair really fast.
3. Now the fun part - Hold the balloon close to the can without actually touching the can. The           can will start to roll towards the balloon without you even touching it!
    Try This Too: While you've got the balloon out, tear up part of a tissue into tiny pieces about       1/4 inch (.5 cm) big. Rub the balloon in your hair again and bring it close to the tissue pieces.     They will be attracted to the balloon and then jump away.


What is happening?
When you rub the balloon through your hair, invisible electrons (with a negative charge) buildup on the surface of the balloon. This is called static electricity, which means "non-moving electricity" The electrons have the power to pull very light objects (with a positive charge) toward them - like the soda can.

Best Plane using cardboard and straw


Materials Required
1. A regular plastic drinking straw
2. 3 X 5 inch index card or stiff paper
3. Tape
4. Scissors

How Do I Do It
1. Cut the index card or stiff paper into 3 separate pieces that measure        1 inch (2.5 cm) by 5 inches (13 cm.)
2. Take 2 of the pieces of paper and tape them together into a hoop as      shown. Be sure to overlap the pieces about half an inch (1 cm) so that they keep a nice round shape once      taped.
3. Use the last strip of paper to make a smaller hoop, overlapping the         edges a bit like before.
4. Tape the paper loops to the ends of the straw as shown below.               (notice that the straw is lined up on the inside of the loops)
5. That's it! Now hold the straw in the middle with the hoops on top and     throw it in the air similar to how you might throw a dart angled slightly up. With some practice you can          get it to go farther than many paper airplanes.